I Am Not Ripping This Seam Again
The seam ripper is one of the most invaluable tools for a sewist. At some point you will have to pick out a seam with your seam ripper. This tutorial shows you the correct way to use a seam ripper. You can seam rip quickly and painlessly and get back to sewing.
Tools for Seam Ripping
A seam ripper is the main tool used for seam ripping. It is a tool with a handle, shaft, and head. The head is forked one side longer and pointy, then flattening out at the base. It becomes a blade and the end of this blade is usually covered in a small red ball. The longer pointy side of the fork is usually inserted into the stitches and then lifted upwards so the thread slips down and is cut by the blade. There are two common sizes of seam rippers, small and large and the blades on a seam ripper do dull over time. Therefore, if you are struggling to cut thread, it is time to replace the seam ripper.
How to Seam Rip
This tutorial will show you how to unpick the seams (or seam rip) on the three most common sewing stitches – regular, serged and coverstitched.

Seam Ripping A Regular Seam:

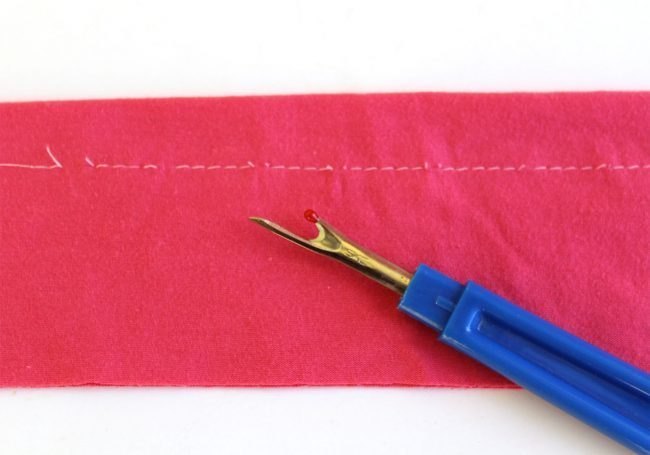
The above image is a regular sewn seam on a normal sewing machine. It has stitch length 3 because it was sewn on a knit fabric. This seam needs to be removed so the first step will be to pick a side. Pick the top thread or bobbin thread – it doesn't matter.

Using your seam ripper, insert the longer pointed end (short ball end up) into one of the first few stitches on the seam and using a pushing forward/pulling up motion cut that one stitch.
Then insert the longer pointed end into the stitch and cut every 5th stitch down the length of the entire seam. It is apersonal choice on how many stitches to leave in between the ones you are cutting. I like to cut around 3/4″ or 1″ spacing, 3/4″ spacing if the stitches are tighter and 1″ spacing if the stitches are longer.

Flip the fabric over and grasp the tail of the thread (the one that hasn't been cut) with your right hand. Hold the fabric gently along the seam with your left hand (or vice versa if you are left handed.)

Next, begin slightly tugging on the tail of the thread while still holding the seam with you left hand. The stitching will start to come apart. Continue pulling until the entire seam has been unpicked. If at any point of this step you can no longer pull the thread because it is stuck or hung up, turn the seam over and using the seam ripper. Next, pick out any stitches that are holding up your main pulling thread, then continue to pull the main thread the rest of the length of the seam.

You have now successfully unpicked a regular seam and will be left with little thread bits sticking out, along with the long thread tail that you pulled out. If you own a seam ripper that has the rubber knob on the handle end, now is the time to use it to "erase away" these thread bits. Otherwise, just wipe them off or pull them out.
Seam Ripping a Serged Seam:

The image above is a four thread serger seam, stitched on knit and with a stitch length of around 3. A serged seam is the most difficult to remove but if you know what you are doing it can go much faster and will not be a dreaded chore. The key is to locate the two needle threads in the stitch. They are the two threads that create two parallel rows of stitching toward the bottom of the seam in the photo above. You will be focusing on these two rows of stitching.

Using the pointed end of the seam ripper, insert it into these two rows of stitching and only cutting these threads at the same time. Next, cut every 4-5 stitches using a pushing forward/pulling up motion. Try not to cut the looper thread in this process. Continue to cut the two needle threads (every 4-5 stitches) down the entire length of the seam.

Next, using the seam ripper, carefully insert the pointed end underneath the looper stitches on the edge of the fabric and tug/loosen the threads. Do not cut them. Work your way down the entire seam, slightly tugging on this thread will help loosen it and the needle stitches will loosen as well.

Take the end of the looper thread with your right hand and holding the fabric with your left (or vise versa). Then start to pull the thread away from the fabric, which should unpick the seam. It will look messy and you are ignoring the looper thread on the back of the seam. However, if you find it helps, you can pull it at the same time as you pull the front looper thread. Try either way to see which method works best for your seam.

From time to time when pulling the looper thread, it will get stuck/caught/knotted on the needle stitches and you will not be able to pull anymore. If this happens take your seam ripper and cut through the knotted needle threads and/or unpick them. You should be able to continue to pull the looper thread after you have cut the threads in the problem area. The photo above shows a spot were the looper thread was stuck and I cut the few needle stitches to free the looper thread.

Congratulations you have successfully unpicked a serger seam. Now clean up all those little thread bits and the two long looper threads can be thrown away.
Seam Ripping a Coverstitch Seam:

The easiest of these three types of seams to unpick is the coverstitch. As long as you learn what to do, this task is done in less than a minute. The key to removing these stitches is figuring out the correct direction you will start unpicking. You will want to start unpicking on the side where you stopped stitching/sewing. I can tell this is where I ended my stitches because the tail threads are pulled to the back/wrong side of my garment. The tail threads on the right side are still on top of the sleeve, thus this is where I started sewing and NOT where I want to start unpicking.

The first step is to insert the seam ripper into the first set of stitches and pull those tail threads to the front. Once the tail threads are on the right side of the fabric, you then carefully unpick 4-5 stitches in a row. Be careful not to cut any of them. In the above photo, I have pulled the tail threads to the front and unpicked 2 stitches, I will continue to unpick 2-3 more.

Turn your fabric over to the wrong side and you will see the looper thread will be the only one on this side. Grasp this tail and give a gentle tug/pull.

The entire seam will start to unravel, continue pulling until the entire length of the seam is unpicked.

Once you are done pulling all the looper thread on the wrong side, turn your fabric/garment over. Then just pull the two needle threads off (because they will just be sitting there) and throw away the threads.

If you are unsure as to the correct direction to start unpicking (if the threads were all trimmed, if it was sewn a while ago or store bought) you can pick a side and follow the same instructions as the first step. When you get the second step and grasp the looper thread to start pulling, instead of the seam coming unraveled, it will pull tight and appear to knot on itself. Thus you can not pull this thread anymore. If this is the case, you now know where the stitching was started and you can abandon this end and move on to the other side, following all of the steps above.
There you have it, you now know how to seam rip three common types of seams. Once you have learned these simple techniques, seam ripping will never be a dreaded chore again (ok, you might still dread it, but at least you should be able to do it faster.)

Source: https://www.peekaboopages.com/2018/06/back-to-basics-seam-ripping.html
Posting Komentar untuk "I Am Not Ripping This Seam Again"